
Throughout cultures, very slight differences appear in what is considered "the ideal" for proportions in the adult human body, but we will focus on drawing them for artistic rendering purposes, or what the art world calls "ideal".
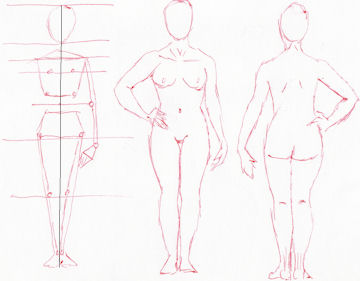
 Normal humans are usually 7-8 times the height of their heads, meaning you can use the height of the head as a unit of measurement to give you "lay lines" for the major parts of the body. "Ideal" humans in the art world are 8 heads tall, giving them longer more graceful lines. The adult figures to the left are labeled for 7.5 heads tall. Feel free to use whichever you prefer. I will detail where the "leylines" should go for a figure 8 heads tall for simplicity.
It takes many steps to explain, but once you have done it once or twice, it feels much more natural and you can quickly begin to play with different positions for legs, arms, and rotation of the body.
Step 1: draw a scale along the side of your paper split into "head height" sections.
Step 2: Draw lightweight horizontal lines at each "head unit" from the edge of your paper all the way across the page. You should have 9 lines, and 8 head-height spaces.
Step 3: Label each line from top to bottom as follows (noted in green), along the side of the page for later reference.
Now we add a few more lines and dots for the widths of shoulders, ribcage, waist, and hips.
Now for the hips:
Legs:
Arms:
Now your wire skeleton is complete! Lightly sketch in the outline of the body around this skeleton remembering that muscle adds width to the widest part of the hips just below the hip joint, and that the widest part of the calves is roughly 1/3" of the way between knee and ankle.
 Normal humans are usually 7-8 times the height of their heads, meaning you can use the height of the head as a unit of measurement to give you "lay lines" for the major parts of the body. "Ideal" humans in the art world are 8 heads tall, giving them longer more graceful lines. The adult figures to the left are labeled for 7.5 heads tall. Feel free to use whichever you prefer. I will detail where the "leylines" should go for a figure 8 heads tall for simplicity.
 It takes many steps to explain, but once you have done it once or twice, it feels much more natural and you can quickly begin to play with different positions for legs, arms, and rotation of the body.
Step 1: draw a scale along the side of your paper split into "head height" sections.
Step 2: Draw lightweight horizontal lines at each "head unit" from the edge of your paper all the way across the page. You should have 9 lines, and 8 head-height spaces.
Step 3: Label each line from top to bottom as follows (noted in green), along the side of the page for later reference.
- From the top of the head to the chin
- from previous position to the armpit
- from previous position to the navel (and elbow joint)
- from previous position to the crotch
- from previous position to mid-thigh (and the tips of the fingers)
- from previous position to just below the kneecaps
- from previous position to the middle of the shinbone
- from previous position to the heels or floor
- Crotch should be half way up the body.
- Kneecap is at 1/2 the length of the leg (minus the foot).
- Elbow is at 1/2 the length of the arm (minus the hand).
- Ribcage ends just above the elbow.
- Hipbones start just below the elbow.
- Widest part of hips starts just above the wrist.
Now we add a few more lines and dots for the widths of shoulders, ribcage, waist, and hips.
 |
| If I can draw this, you certainly can! |
- Draw a vertical line in the center of the page to represent the mid line of the body.
- Draw an egg shape to represent the head, with the "small end" of the egg pointing downward (for the chin).
- 1.5 head-length from the top = shoulder bones. These should be 2 head widths wide for a woman, and 2.5 head widths wide for a man. Mark the width with a dot.
- Between 1 and 1.5 heads, mark the center line and draw a slope from here to the shoulder bone ends. This new line is the slope of the shoulders.
- At the line labeled "armpit", measure outward from the center just shy of one head-width. This is the widest part of the ribcage, on each side.
- If you are drawing a woman, locate the line labeled "armpit" and go downward 1/4 head-length. This is where the nipple line should fall, and each nipple should be roughly 1/2 head width from the center line. For men, the nipple line is slightly higher, close to the armpit in height.
- Find the line marked "navel" and go up 1/4 head-length. This is where the bottom of the ribcage stops, and should be roughly 1 head-width wide.
- Connect the wide and narrow points of the ribcage with a line.
Now for the hips:
- Locate the line labeled "navel" and measure down 1/4 head-length. This is the top of the pelvis, and should be 1/2" head-width per side.
- Locate the line labeled "crotch" and mark a dot 1 head-width from the center for women, or slightly less than 1 head-width for men. (Mark each side of the center line) This is the bottom of the pelvis where the leg bones attach.
Legs:
- Find the line labeled kneecap and mark 1/2" head-width to either side of the center line. This point is the bottom of the kneecaps, or patellas. Draw a line from your hip location to the new kneecaps. This line is your sketch's femur.
- Find the line labeled "heels" and mark 1/4 head-width outward from the center line.
- Measure up 1/4 head-height from this dot and make a mark. Connect this mark to your kneecap. This is you figure's shin bone, and the mark below it is the bottom of your figure's heel.
Arms:
- Find the line labeled "navel" and measure outward 1+1/4 head widths. This point is your figure's elbow. Draw a line from the elbow to the end of your figure's shoulder bones to complete the upper arm.
- Find the line labeled "crotch" and measure down 1/4 head-height. This is where the wrist joint begins. The wrist joint connects to the elbow for your figure's lower arm.
- Find the line labeled "mid-thigh" Along this line is where the ends of the fingers touch. Draw a simple hand (an elongated oval or a diamond shape will do) anywhere between the wrist joint and this line.
Now your wire skeleton is complete! Lightly sketch in the outline of the body around this skeleton remembering that muscle adds width to the widest part of the hips just below the hip joint, and that the widest part of the calves is roughly 1/3" of the way between knee and ankle.
No comments:
Post a Comment