
As an artist primarily concerned with conveying how a garment will look before it is actually crafted, it is often important to capture the body in nontraditional poses to express how a fabric's folds and drapes will behave. It is one thing to draw a semi transparent layer of fabric, but another thing entirely to show that it is soft and fluttering vs stiff and starched. This is especially important when proof drawing for theatre and dance where motion is not only implied, but a large part of the aesthetic.
Before one learns how to draw fabric that reacts to its environment and gravity (topics for later posts), one must learn how to draw the flexible bending frame on which fabric is hung. It is not important to be perfect at this -- God knows I certainly am not! What is important is to give the correct impression. Most design proofs are far from photo realistic, especially where the body frame is concerned, so don't be too precious about it while learning -- you will develop a style that works well for you and, more likely than not, it won't be photo realistic.
The three blocks of the body: Head, Chest, and Pelvis
The main moving portions of the human body are the head, the chest, and the pelvis. Lets focus for now on the relationship between chest and pelvis. When the body bends, these two blocks move in opposite directions in order to maintain balance. When you bend over to touch your toes, your shoulders bend forward, and your pelvis top tilts backwards. When you stretch to the left side, the chest tilts to the left and the pelvis tilts to the right.
 If it helps to visualize this, you can cut out two paper trapezoids (one for the chest, one for the pelvis) and tape them to a string that will function as your spine. Make sure the two trapezoids are roughly 1/2 head-height apart on the string. Now bend and move them -- study how they look and how the string spine curves. Pick up the paper trapezoids and move them in 3 dimensions, bending the figure forward and back.
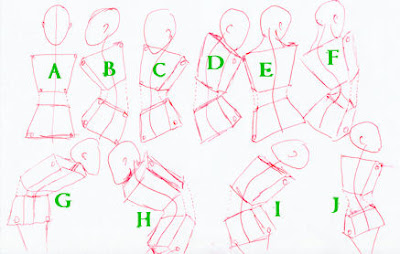 The basic proportion skeleton we drew in yesterday's post is exactly the same for bent figures -- the trapezoids are just moved in space. Adding thickness to the frame allows you to see better where different areas attach. The front right rib to front right hip, no matter where the two blocks are bent, and so on. (Subtle dotted lines connect the major corners). Even in a complex twisting frame (J), the same holds true. Drawing the head in front or partially obscured makes the figure face a particular direction. Figures C and F are nearly identical, the only difference being the head/face being fully visible, or partially hidden by the neck/shoulders.
Heads can be drawn in many more rotations and positions than the chest and pelvis blocks are capable of moving naturally, however it is drawn in only 2 basic shapes: the egg, and the tilted teardrop. To show a head in profile, it is important to give an impression of the jawline and chin which is the point of the teardrop. Look at figures B through J and you will see that the head is the same shape, with the tip of the teardrop the only part that changes position.
Next: Movement and Balance Points: Where to draw legs on a complex figure.
Before one learns how to draw fabric that reacts to its environment and gravity (topics for later posts), one must learn how to draw the flexible bending frame on which fabric is hung. It is not important to be perfect at this -- God knows I certainly am not! What is important is to give the correct impression. Most design proofs are far from photo realistic, especially where the body frame is concerned, so don't be too precious about it while learning -- you will develop a style that works well for you and, more likely than not, it won't be photo realistic.
The three blocks of the body: Head, Chest, and Pelvis
The main moving portions of the human body are the head, the chest, and the pelvis. Lets focus for now on the relationship between chest and pelvis. When the body bends, these two blocks move in opposite directions in order to maintain balance. When you bend over to touch your toes, your shoulders bend forward, and your pelvis top tilts backwards. When you stretch to the left side, the chest tilts to the left and the pelvis tilts to the right.
 If it helps to visualize this, you can cut out two paper trapezoids (one for the chest, one for the pelvis) and tape them to a string that will function as your spine. Make sure the two trapezoids are roughly 1/2 head-height apart on the string. Now bend and move them -- study how they look and how the string spine curves. Pick up the paper trapezoids and move them in 3 dimensions, bending the figure forward and back.
  The basic proportion skeleton we drew in yesterday's post is exactly the same for bent figures -- the trapezoids are just moved in space. Adding thickness to the frame allows you to see better where different areas attach. The front right rib to front right hip, no matter where the two blocks are bent, and so on. (Subtle dotted lines connect the major corners). Even in a complex twisting frame (J), the same holds true. Drawing the head in front or partially obscured makes the figure face a particular direction. Figures C and F are nearly identical, the only difference being the head/face being fully visible, or partially hidden by the neck/shoulders.
 Heads can be drawn in many more rotations and positions than the chest and pelvis blocks are capable of moving naturally, however it is drawn in only 2 basic shapes: the egg, and the tilted teardrop. To show a head in profile, it is important to give an impression of the jawline and chin which is the point of the teardrop. Look at figures B through J and you will see that the head is the same shape, with the tip of the teardrop the only part that changes position.
Next: Movement and Balance Points: Where to draw legs on a complex figure.
No comments:
Post a Comment